We have all been there. You have a clear image in your head: a stunning, photorealistic portrait. You type your idea into an AI art generator—something simple like “a photorealistic portrait of a woman”—and you hit “generate.” What comes back is… not right. The eyes are slightly uneven. The skin looks like plastic. Or, worst of all, you get the dreaded six-fingered, mangled hands. It can feel like a lottery, and it’s incredibly frustrating.
Hi, I’m Mahnoor Farooq. For years, I’ve been fascinated by creative AI tools, and I love sharing what I discover. After working in the tech and AI space for over five years, I’ve spent countless hours testing what separates a frustrating result from a fantastic one. It’s often not about the most complex software but about how we talk to it. My goal here isn’t to share ‘secret’ codes, but to pass on the practical, hands-on lessons I’ve learned. Hopefully, these tips can save you some frustration and help you create the images you’re imagining.
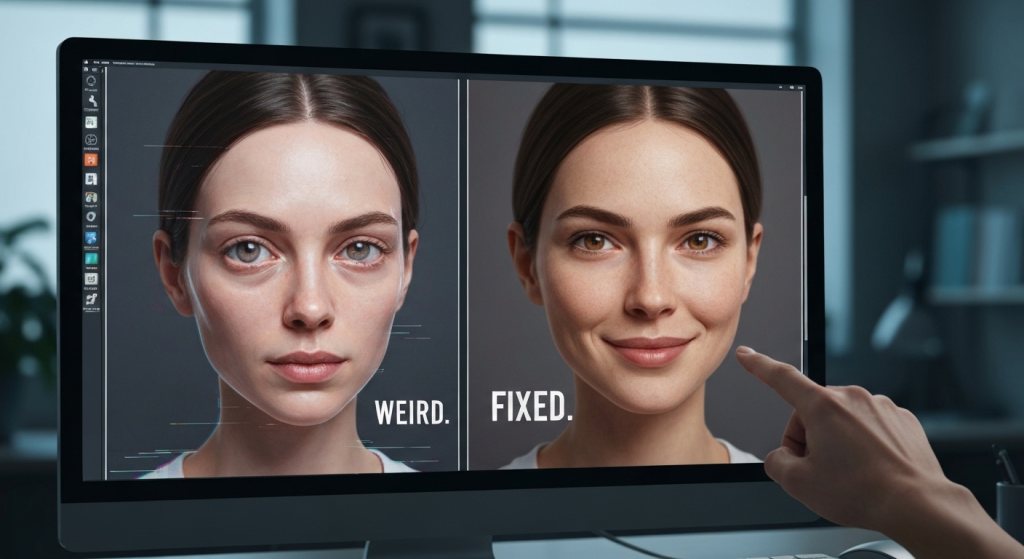
The truth is, the AI isn’t lazy or broken. It’s just very literal. It’s trying to follow your instructions based on billions of images it has studied. When your instructions are vague, it has to guess. And its “guesses” are an average of everything it knows about a “woman,” which is often a blurry, generic, slightly strange-looking person. The good news is that you can control these results. It just takes a few simple changes in how you write your prompts. Let’s break down the exact tweaks that took my portraits from “weird” to “wow.”
Why Your AI Portraits Look “Weird” (The Common Pitfalls)
Before we fix the prompts, we need to understand why they break. When I first started, my prompts were failing for three main reasons. Understanding this is the first step to getting better results.
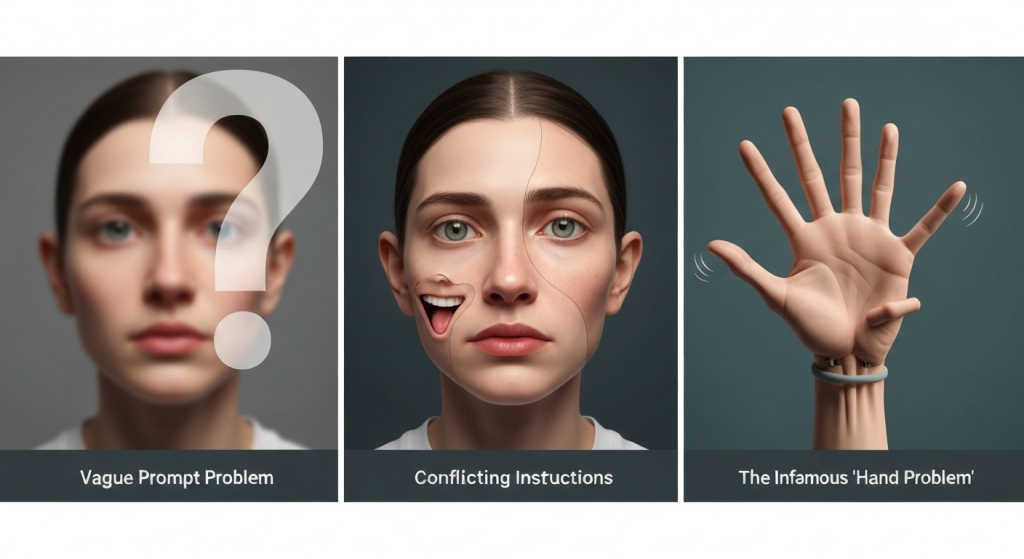
The Vague Prompt Problem
My early prompts were things like “a man” or “portrait of a woman.” The AI has no context for this. What man? What age? What style? To fulfill this request, the AI blends thousands of different portraits—paintings, photos, 3D renders—into one “average” image. This is why you get that smooth, uncanny valley skin and a generic, lifeless expression. The AI is trying to give you everything at once, which results in nothing specific.
Conflicting Instructions
Sometimes I would try to get specific and end up confusing the AI. A prompt like “a photorealistic painting of a sad, happy woman” is full of contradictions. Is it a photo or a painting? Is she sad or happy? The AI will try to do both, creating a bizarre image that fails at everything. You have to give it one clear, direct path to follow.
The Infamous “Hand Problem”
Hands are the most difficult part. Here’s the thing: the AI (specifically a diffusion model) doesn’t understand anatomy. It doesn’t know a hand has one thumb and four fingers. It just knows from its training data that “a person” is often connected to “a shape with five-ish long bits at the end.” It’s matching patterns, not building a 3D model. When the prompt is simple, it just pulls in the most common hand-like patterns it knows, which are often mangled or hidden.
The Foundation: Building a Strong Portrait Prompt from Scratch
The best way to fix weird portraits is to prevent them from happening in the first place. This means building your prompt with a clear, logical structure. I found that a good prompt is built in layers, just like a painting.
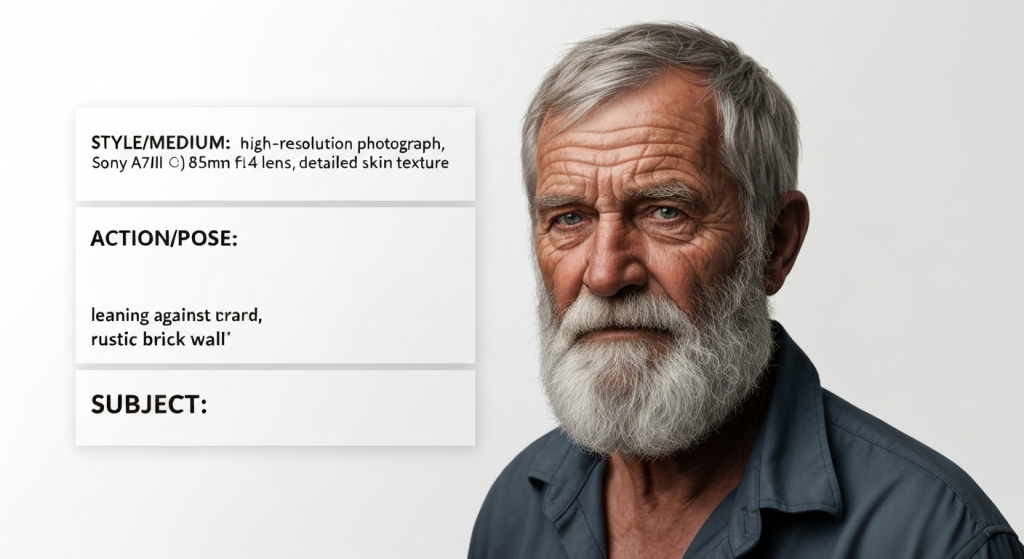
Step 1: Subject First (The “Who”)
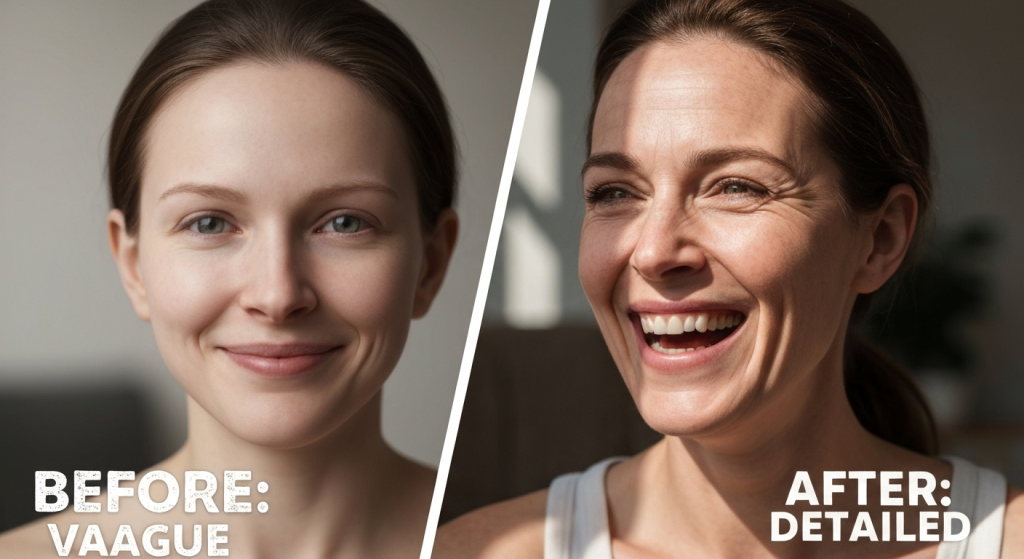
This is your main focus. “A woman” is not a subject; it’s a category. You need to be far more descriptive. The more details you give the AI about the person, the less it has to guess.
- Vague: “a man”
- Specific: “a 60-year-old fisherman with a gray beard and deep wrinkles”
- Vague: “a young woman”
- Specific: “a 25-year-old woman with bright red curly hair and freckles”
In my own tests, “a man” gave me a generic, 30-something male model. The “fisherman” prompt, however, instantly produced an image with character, texture, and a story. The “deep wrinkles” detail was key to getting a realistic, textured face instead of smooth, “airbrushed” skin.
Step 2: Action or Pose (The “What”)
What is your subject doing? This grounds them in reality. A static, “standing” pose often looks stiff and fake, like a
video game character. A natural action or pose makes the portrait feel like a captured moment.
- Vague: “standing”
- Specific: “leaning against a rustic brick wall”
- Vague: “looking at the camera”
- Specific: “looking over her left shoulder with a candid smile”
- Vague: “happy”
- Specific: “laughing candidly, head tilted back slightly”
“Happy” is an emotion, but “laughing candidly” is an action. The AI knows what that looks like and can find better references for it.
Step 3: Style & Medium (The “How It Looks”)
This is perhaps the most important tweak. The AI needs to know how to render your image. Is it a photo? A painting? A sketch? If you don’t specify, it will probably blend all three.
For photorealism, the magic word is “photograph.” But you can get even more specific. When I started adding camera and lens details, the quality of my portraits changed overnight. You don’t need to be a photographer to use these.
- Good: “photograph”
- Better: “a high-resolution photograph”
- Best: “shot on a Sony A7III, 85mm f/1.4 lens, detailed skin texture”
Why does this work? The AI has seen thousands of photos labeled with that camera and lens. It knows an 85mm f/1.4 lens creates a beautiful, blurry background (called “bokeh”) and a sharp subject. By adding this, you are telling the AI to copy the properties of a high-end portrait photo.
Here is a quick comparison of style keywords and the results they tend to produce:
| Style Keyword | Typical Result | When to Use It |
photograph, photorealistic | Looks like a real photo. Good default. | When you want realism above all else. |
shot on 85mm f/1.8 lens | Creates a blurry background (bokeh), sharp focus on the face. | For professional-looking, classic portraits. |
digital art, concept art | A clean, sharp, often stylized illustration. | For fantasy or sci-fi characters, or a “perfected” look. |
oil painting, impasto | Looks like a traditional painting. Impasto adds thick, textured paint. | For artistic, classical, or expressive portraits. |
charcoal sketch, pencil drawing | A black and white, hand-drawn look. | For simple, minimalist, or raw emotional portraits. |
Powerful Tweaks for Specific Problems
Okay, you’ve built a solid prompt, but you’re still getting weird results. Now it’s time for the advanced fixes. These are the “secret weapons” for targeting specific issues like plastic skin, bad lighting, and, yes, those hands.
Tweak 1: Using Negative Prompts to Remove What You Hate
A negative prompt is a parameter where you tell the AI what not to do. This is your “cleanup” tool. Almost every AI platform has a field for this (in Midjourney, it’s --no; in Stable Diffusion, it’s a separate “Negative Prompt” box).
When I first started, my portraits all had the same “airbrushed” video game skin. The moment it “clicked” for me was when I started negatively prompting “plastic” and “smooth.” This forced the AI to look for its other references for skin—the ones with texture, pores, and freckles.
Common Negative Prompts for Portraits:
deformed, disfigured, ugly, grotesque(A general cleanup)extra limbs, extra fingers, malformed hands, mutated hands(Essential for hands)blurry, grainy, low resolution, pixelated(Improves image quality)painting, drawing, illustration, 3d render, anime(Use these if you want a photo)airbrushed, smooth skin, plastic(To get realistic skin texture)cluttered background, watermark, text, signature(Cleans up the image)
Don’t go overboard. Just add the 3-5 most important things you want to avoid.
Tweak 2: The Magic of “Weighting” Your Words
Sometimes the AI ignores a part of your prompt. You ask for “a woman with red hair and a blue dress,” and you get a woman with blue hair and a red dress. This is because the AI got confused about which word applied to which object.
Weighting tells the AI what is most important. The method differs by platform, but the concept is the same.
- In Stable Diffusion (and many others), you use parentheses:
(red hair:1.3). This tells the AI “red hair” is 30% more important. You can also de-emphasize:(blue dress:0.8). - In Midjourney, you can use the syntax
red hair::1.5andblue dress::1. Or, you can just put the most important words at the very beginning of the prompt. Midjourney pays more attention to the start of the prompt.
When I was stuck, weighting was the tool that gave me back control. If I wanted to ensure I got freckles, I would write (freckles:1.4).
Tweak 3: Describing the Light (The Pro Move)
This was the biggest game-changer for me. Vague lighting is a primary cause of flat, boring, or “weird” portraits. The AI doesn’t know where to put shadows, so it makes the face look flat.
Describing the light source instantly adds realism and depth.
- Vague: “a portrait”
- Specific: “a portrait with soft window light coming from the left”
- Dramatic: “dramatic side lighting, casting a strong shadow”
- Warm: “golden hour lighting, warm and soft”
- Moody: “cinematic lighting, rim light” (Rim light creates a thin halo around the subject)
“Golden hour” and “soft window light” are two of my most-used phrases. They almost always produce a beautiful, realistic, and well-lit subject.
Case Study: Fixing a “Broken” Portrait (Before & After)
Let’s put this all together. Here is a real example of a “before” prompt that gave me weird results and the “after” prompt that fixed it.
The “Before” Prompt and its Problems
My Prompt: A photorealistic portrait of a happy woman.
The Problems:
- “Photorealistic” is good, but not specific enough.
- “Happy” is a vague emotion. The AI gave me a creepy, “uncanny valley” smile with perfect, bright-white teeth.
- “Woman” is generic. The result was a 20-something, airbrushed model.
- No Lighting: The face was flat and evenly lit, like a bad flash photo.
- No Negative Prompt: The skin was plastic, and the background was a random, blurry mess.
The “After” Prompt: Applying the Tweaks
My New Prompt: A highly detailed photograph of a 40-year-old woman with laugh lines, candidly laughing. Soft natural window light from the side. Shot on a 50mm f/1.8 lens. Detailed skin texture.
Negative Prompt: 3d render, painting, airbrushed, smooth skin, deformed, extra fingers, ugly, blurry background
Why This Worked:
- Subject: “40-year-old woman with laugh lines” gave the AI permission to add realistic texture and character.
- Action: “Candidly laughing” is a natural action, not a staged emotion. It fixed the “creepy smile” problem.
- Style & Medium: “Highly detailed photograph” + “50mm f/1.8 lens” told the AI exactly what kind of photo to make (sharp subject, blurry background).
- Lighting: “Soft natural window light from the side” created realistic, gentle shadows, giving the face depth.
- Negative Prompt: This cleaned up everything else. It removed the plastic skin, fought deformations, and ensured the background wasn’t distracting.
A Comparison Table: Prompting Strategies
Here’s how the two approaches stack up.
| Prompt Element | Vague “Before” Prompt | Specific “After” Prompt |
| Subject | a happy woman | a 40-year-old woman with laugh lines, candidly laughing |
| Style/Medium | photorealistic portrait | highly detailed photograph, shot on a 50mm f/1.8 lens |
| Lighting | (None) | soft natural window light from the side |
| Key Detail | (None) | detailed skin texture |
| Negative Prompt | (None) | 3d render, painting, airbrushed, smooth skin, deformed, blurry |
When Tweaks Aren’t Enough: Other Tools in Your Kit
Sometimes, even the best prompt will produce a single weird element, like one bad hand. You don’t have to throw away the whole image. Here are a few other methods I use.
Inpainting and Outpainting
Most AI tools (like Stable Diffusion or DALL-E) offer “inpainting.” This lets you erase just the “weird” part of the image (like the hand) and have the AI only regenerate that small area. You can use your same prompt, or a new prompt like “a realistic left hand resting on a table.” This is my #1 tool for fixing hands.
The Power of “Seed” Numbers
A “seed” is the random starting number for your image. Think of it as the ID number for that specific “generation.” Most AI tools let you see and reuse this number.
Here’s the trick: If you get a portrait you almost love, copy its seed number. Then, use that same seed but make a small tweak to your prompt. For example, change “a woman with brown hair” to “a woman with red hair.” Because the seed is the same, you will get the exact same pose, lighting, and composition, but with the new detail. It’s perfect for making small changes without losing the “feel” of an image. For a more technical dive, you can learn more about understanding the ‘seed’ parameter.
Frequently Asked Questions (FAQs)
Why does the AI keep giving my portraits 6 fingers?
The AI doesn’t understand anatomy. It’s a pattern matcher. It has learned that “person” is associated with “hand-shaped blobs” but hasn’t learned the rule of “five fingers.” To fix this, use a strong negative prompt like extra fingers, malformed hands, mutated hands, six fingers, deformed. Using inpainting to fix just the hand is also a very effective solution.
What is a “negative prompt” again?
It’s a field where you tell the AI what you do not want to see. It’s a “filter” for bad results. Instead of just describing what you want (a photo), you can also reject what you don’t want (a painting, a 3D render). It’s one of the most powerful tools for cleaning up your images.
How do I get a more realistic, photo-like portrait?
Use specific photographic terms.
- Start your prompt with “a high-resolution photograph of…”
- Add a camera lens, like “shot on an 85mm f/1.4 lens.”
- Describe the light: “soft window light” or “golden hour.”
- Add a negative prompt:
--no painting, drawing, 3d render, illustration, airbrushed, smooth skin.
Does the order of words in my prompt matter?
Yes, very much. Most AI models pay more attention to the words at the beginning of your prompt. Your most important concepts—usually the subject and style—should come first. For example, “A photorealistic portrait of an elderly man…” is better than “An elderly man in a park, photorealistic style…”
My Final Thoughts: It’s a Skill, Not Magic
Getting good AI portraits isn’t about finding one “magic word.” It’s about learning to communicate clearly. The AI isn’t a mind reader; it’s a very literal assistant that needs specific, detailed instructions.
Don’t get discouraged by the “weird” results. Every one of them is a lesson. That six-fingered hand is teaching you to use a negative prompt. That plastic skin is teaching you to ask for “detailed skin texture.” Through my own five years of working with these tools, I’ve found that patience and specific tweaks are the real secret. Start with a strong subject, define your style and light, and use negative prompts to clean up the rest. You’ll be amazed at how quickly your results go from “weird” to wonderful.